

Instead of collecting your new car and arranging protection after the first commute, coordinate dealer release, transport, inspection, and installation before pickup. For new car protection before first drive in 2026, have paint protection film installed before any compatible ceramic coating, and make your first personal drive conditional on the installer’s release instructions.
- New car protection before first drive requires dealer coordination and transport to the installer before your first personal drive.
- CoaterZ serves Florida Gulf Coast owners seeking paint protection film, ceramic coating, and window tint services.
- Install paint protection film before compatible ceramic coating; confirm the sequence with the installer.
- Ceramic coating does not replace film for stone-chip protection, and neither treatment eliminates maintenance.
Why this matters
Protection installed after the drive home cannot prevent damage sustained during that drive. A before-first-drive plan changes the handoff: the dealer releases the vehicle to an agreed transporter or installer rather than sending you straight onto the road.
CoaterZ is best suited to Florida Gulf Coast vehicle owners seeking professional paint protection and detailing services. Owners in Palm Harbor, Lutz, and Sarasota can use CoaterZ as the starting point for discussing vehicle condition, intended use, and installation scope.
For your 2026 delivery, define “fully protected” by the surfaces and risks covered—not by a package name. Film addresses physical paint exposure, coating supports surface maintenance, and tint addresses glass-related needs; none makes a vehicle damage-proof.
Before you start
- Obtain release authority and transport access. Confirm who can collect the vehicle, what paperwork the dealer requires, and where loading is permitted. Give both businesses the same vehicle identification and delivery contact.
- Prepare a surface and usage brief. Identify factory paint, repainted panels, matte finishes, existing films, and any dealer-applied treatments. Explain highway use, outdoor parking, coastal exposure, and cargo use so recommendations match the vehicle.
- Resolve the coating-before-film trap. Tell the dealer not to apply optional wax, sealant, ceramic coating, or dressing to planned installation surfaces without approval. Existing treatments can require removal or additional preparation before film installation.
Do not schedule a same-day personal drive around an assumed completion time. Transport, preparation, installation, inspection, and product-specific curing requirements determine the handover—not the dealership’s collection appointment.
Dealer release and transport plan
Agree on the handoff
- Confirm the delivery date. Ask the dealer when the car will actually be ready for inspection and authorized release. Keep the protection appointment coordinated with that date rather than the original estimated arrival.
- Send written preparation instructions. Request no optional paint protection treatments before the installer assesses compatibility. Agree on cleaning separately; asking for no added coating does not mean accepting a vehicle too dirty to inspect.
- Choose the transport arrangement. To avoid driving the car to the installer, arrange suitable vehicle transport. Ask how loading, tie-downs, ride height, and vehicle-specific towing requirements will be handled; enclosed transport reduces exposure during transit but does not eliminate handling risk.
- Document vehicle condition. Take at least 4 exterior views, plus close-ups of any marks, wheel damage, or disputed areas. Record the odometer and repeat the condition check at the installer.
Expected result: the dealer, transporter, and installer share a release plan, and you have a condition record before the vehicle changes hands.
Keep the 2026 delivery record in 1 shared folder containing the release confirmation, condition photographs, scope, and care instructions. This keeps the agreed starting condition separate from later installation observations.
If the dealer proposes applying protection before collection, ask who performs it, which surfaces it covers, and what preparation is included. Judge the written scope rather than assuming “dealer protection” means the same work as a specialist installation.
Protection scope and surface preparation
Match each treatment to its job
- Identify the exposure. Mark the panels most exposed to road debris and the surfaces affected by your actual use. Include coastal parking and cargo handling where relevant; do not turn every possible treatment into a required purchase.
- Select coverage by panel. Specify the bumper, hood, fenders, mirrors, rocker areas, or other agreed panels individually. The PPF coverage guide provides a starting point for discussing coverage boundaries.
- Request a condition assessment. Have the installer inspect contamination, scratches, paint defects, and previous repairs before deciding on preparation. New paint is not automatically ready for film or coating, and correction should follow inspection rather than a blanket assumption.
- Confirm surface compatibility. Identify matte paint, textured plastics, rubber, repainted panels, and existing film. Ask which treatment is approved for each surface and which areas will remain untreated.
Expected result: you have a panel-level scope, a preparation plan, and explicit exclusions before installation begins.
| Treatment | Best for | Main benefit | Limitation and maintenance caveat |
|---|---|---|---|
| Paint protection film | Painted panels exposed to road debris | A physical protective layer over covered paint | Coverage is limited to selected areas; edges and film surfaces still need appropriate washing |
| Ceramic coating | Owners prioritizing easier exterior maintenance | A surface treatment that helps reduce contaminant adhesion | Not a substitute for stone-chip film; washing and product-specific care remain necessary |
| Window tint | Drivers managing glare and solar exposure | Changes the glass’s light and solar performance according to the film selected | Darkness alone does not establish heat rejection; placement must meet applicable law |
| Undercoating | Owners evaluating underbody exposure | A treatment for approved underbody surfaces | Existing corrosion, drainage, service access, and material compatibility require assessment |
| Bedliner | Trucks carrying equipment or materials | A protective surface for the cargo bed | Does not protect surrounding body panels; preparation and drain clearance matter |
Choose protection by failure mode, not by the number of services on the estimate. For example, a ceramic-coated hood remains exposed to stone impacts unless an appropriate physical barrier also covers it.
Florida sun, salt exposure, and road wear do not all require the same response. Verify the selected coating’s and film’s published protection claims; ask how exposed fasteners, seams, uncovered panels, and cargo surfaces will be maintained rather than assuming one treatment covers everything.
Installation sequence and release checks
Confirm the work order
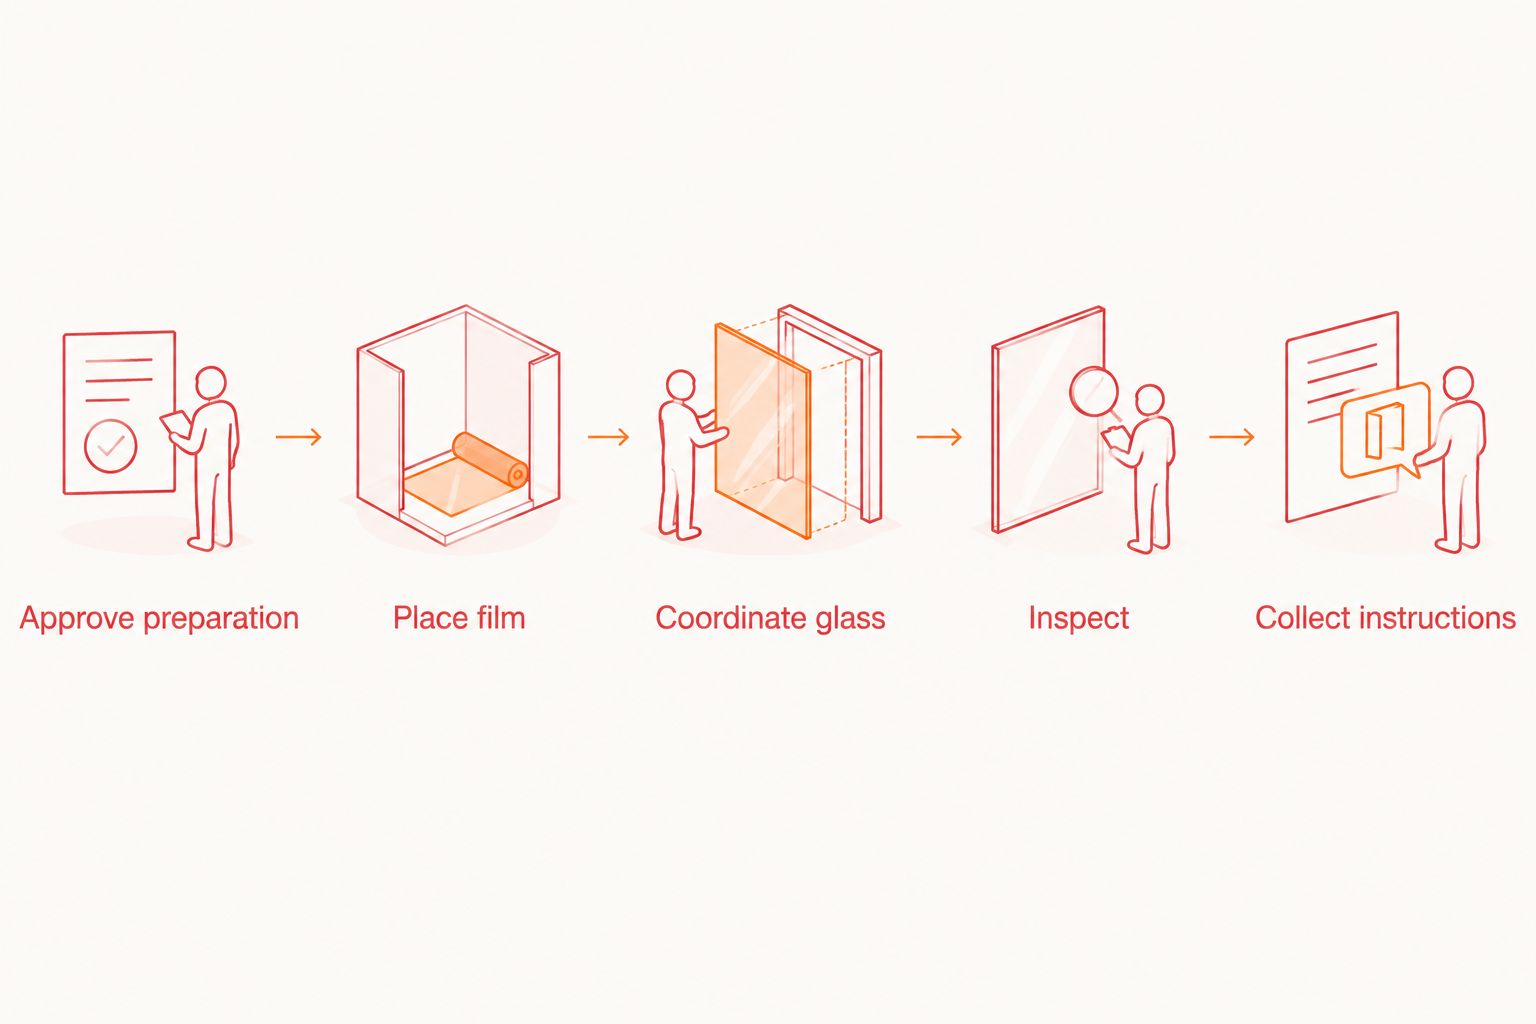
- Approve preparation first. Resolve delivery damage, contamination, and any proposed correction before installation. Do not cover a disputed defect while responsibility for it remains unsettled.
- Place film before compatible coating. Where both treatments cover the same panel, have the installer establish the film installation and curing sequence before coating its surface. Do not apply coating beneath film unless the film system expressly permits that arrangement.
- Coordinate glass and accessory work. Tell the installer about planned tint, trim removal, bedliner work, or underbody treatment. Let the relevant technicians set the sequence so later work does not disturb fresh surfaces.
- Inspect before accepting release. Review film edges, cutouts, covered panels, glass visibility, and any remaining installation observations with the installer. Ask which temporary moisture effects are expected and which conditions require a return visit.
- Collect written care instructions. Obtain the selected products’ restrictions for water exposure, washing, window operation, and follow-up inspection. Confirm when the vehicle is ready to travel and when each surface is ready for routine cleaning.
Expected result: the installed scope matches the approved work order, and your first drive follows the actual release requirements.
For a 2026 vehicle with cameras or sensors near the glass, identify those areas before tint installation. Follow the vehicle manufacturer’s requirements for camera views and any calibration-related procedures; tint installation does not automatically mean every vehicle needs calibration.
Avoid universal curing promises. Film, coating, tint, ambient conditions, and the installed surface influence the instructions you receive, so a general internet timeline is not a release authorization.
Plan the first drive
- Confirm travel readiness. Ask whether the vehicle can leave under its own power or whether transport remains the appropriate choice. Separate permission to drive from permission to wash.
- Review the route. Avoid known roadworks and loose-surface routes where practical, but do not treat route selection as a replacement for installed protection.
- Set the first cleaning reminder. Use the installer’s written care window rather than an assumed number of days. Record any product-specific inspection appointment separately.
Expected result: you leave knowing what is protected, what remains exposed, and which actions must wait.
If you must collect the car yourself
The adjacent workflow is dealer pickup followed by immediate installation. It cannot meet a literal before-first-drive promise, because the dealer-to-installer journey happens on untreated surfaces.
Ask CoaterZ to confirm the installation appointment before collecting the vehicle. Keep the journey focused on delivery to the installer rather than adding errands, and document the condition again on arrival.
Use the same preparation, coverage, installation, and release checks described above. If a chip occurs during the transfer, resolve the repair approach before film covers that area; protection does not reverse existing damage.
This is also the practical route when the vehicle has already come home. Change the objective from “before first drive” to “before routine use,” without pretending the earlier exposure did not happen.
Troubleshooting the handoff
- The dealer already applied a sealant or coating. Obtain the treatment name and application record. Tell the installer before arrival so removal, preparation, or compatibility assessment can be included in the work scope.
- The delivery date changes after booking. Update the dealer, transporter, and installer together. Reconfirm the sequence before authorizing collection rather than leaving the vehicle between uncoordinated appointments.
- You discover scratches or suspected repainting. Photograph the area and resolve the dealer’s response before approving correction or coverage. Repaired paint requires its own suitability assessment; do not assume it behaves like the original finish.
- Film edges lift or an installation mark concerns you. Send clear photographs to the installer and follow the response instructions. Do not pick at edges, puncture bubbles, or try heat-based repairs yourself.
- The car gets wet before the stated care window ends. Contact the installer with the timing and conditions. Do not scrub the surface or apply a chemical remedy unless instructed.
Customize your workflow
Build your 2026 protection plan around the car’s use after delivery. A highway commuter needs a different coverage discussion from a truck carrying tools or a vehicle that spends most of its time parked outdoors.
Ask CoaterZ to distinguish essential preparation from optional treatments. Have the discussion separately for painted panels, glass, the cargo bed, and the underbody; compatibility and maintenance requirements are not interchangeable.
For a mixed film-and-coating installation, request a surface map showing which areas receive each treatment. Do not let a coated roof or protected bumper imply that every painted panel has the same protection.
FAQ
How do I arrange new car protection before first drive?
Arrange dealer release directly to a suitable transporter and protection installer before your first personal drive. Confirm inspection, preparation, coverage, installation sequence, and release instructions before collecting the finished vehicle.
Should paint protection film go on before ceramic coating?
Paint protection film normally goes on before a compatible ceramic coating on the same surface. Have the installer confirm the selected film system’s preparation and curing requirements rather than applying a general rule without checking compatibility.
Can ceramic coating stop stone chips on my new car?
Ceramic coating is not a substitute for paint protection film against stone chips. Use film for a physical protective layer on selected panels and consider coating separately for surface maintenance benefits.
Does a new car need paint correction before protection?
A new car needs inspection, not automatic paint correction. The installer should assess contamination and defects, then recommend only the preparation needed for the agreed finish and protection system.
Can I drive home immediately after film and coating installation?
Drive home only after the installer releases the vehicle for travel. Permission to drive does not necessarily mean the surface is ready for washing or every other form of exposure.
Should I let the dealership apply protection first?
Do not authorize an optional dealer treatment until its compatibility with the planned installation is confirmed. Obtain the treatment details and agree on preparation with the protection installer before application.
Is window tint darkness the best way to judge heat rejection?
Tint darkness alone does not establish heat rejection. Compare the selected film’s published solar-performance specifications, confirm legal placement, and check compatibility with the vehicle’s glass and camera areas.
One last thing
Photograph the completed coverage boundaries before your first personal drive. A clean handover photograph often shows less than a panel map: transparent film can make protected and unprotected paint look alike.
Keep that map with your 2026 care instructions. When you wash the car or arrange later bodywork, identify the actual surface before choosing chemicals, tools, or repair procedures.