

Instead of chasing artwork approvals, vehicle availability, and installer updates separately, use a vehicle-by-vehicle fleet vehicle wrap installation process that connects approved designs to inspected, road-ready vehicles. This 2026 workflow gives you clear handoffs without treating a signed mockup as permission to skip surface checks.
- The fleet vehicle wrap installation process needs separate design approval, surface acceptance, installation, and release checks.
- Coaterz suits Florida Gulf Coast vehicle owners seeking professional vinyl wrap installation rather than a DIY project.
- Approve graphics against each vehicle’s actual body configuration before authorizing production.
- Release wrapped vehicles only after inspection and receipt of material-specific care instructions.
Why this matters
A correct logo does not make artwork production-ready. Door handles, panel seams, replacement bodywork, and existing coatings all affect the installation plan. Your workflow must resolve those details before a vehicle leaves its normal route.
Coaterz is best for Florida Gulf Coast vehicle owners seeking professional vinyl wrap installation instead of self-installation. Professional installation puts the application in a specialist’s hands; you still need to approve the message, disclose surface history, and coordinate vehicle access.
Start with the vehicle wrap options for small business fleets if you have not selected coverage. Then use this guide to control approvals and handoffs, whether your vehicles operate around Palm Harbor, Lutz, Sarasota, or elsewhere along the Gulf Coast.
Before you start
- Assign access and authority. Name the person approving graphics, the person releasing vehicles from service, and the installation contact. Use a shared folder and a worksheet that everyone responsible can access.
- Collect the source materials. Gather editable logo files, approved wording, vehicle identifiers, body configurations, current photographs, and any required operating or identification markings. Confirm permission to reproduce supplied artwork.
- Disclose the surface-history gotcha. Tell the installer about repainting, body repairs, rust, peeling clear coat, existing graphics, waxes, and ceramic coatings. A clean-looking panel is not proof that adhesive film will bond correctly or remove cleanly later.
The labels below are suggested worksheet fields, not buttons in a particular software product. Create them in your existing tracking system so the process works without a new application or an assumed integration.
Vehicle record
Build the physical vehicle record before approving artwork. A model name alone does not capture wheelbase, roof height, door layout, accessories, or repaired panels.
- Create the unit entry. Make 1 vehicle record per vehicle, using its fleet identifier and enough identifying information to prevent a mix-up. Add suggested fields named Vehicle ID, Body configuration, Surface history, and Approval status.
- Photograph the actual vehicle. Capture 4 exterior views: front, rear, driver side, and passenger side. Add close-ups of damaged paint, trim, recesses, existing graphics, and accessories that affect coverage.
- Record operational constraints. Note when the vehicle can leave service, who can deliver it, and who can accept it back. Treat the requested return date as a planning requirement, not an installation promise.
- Request surface acceptance. Ask the installer to assess the intended panels and identify repairs, coating removal, or further inspection needed before wrapping. Record unresolved issues in Surface decision rather than hiding them in an email thread.
Expected result: Each vehicle has an identifiable record, usable photographs, disclosed surface history, and a documented decision about whether the intended panels are ready for the next stage.
For your 2026 fleet register, keep the record attached to the physical unit throughout its service life. Replacing a vehicle must trigger a new fit check, even when the replacement looks similar.
Design approval
Separate approval of the message from approval of its placement. A spelling correction and a change in coverage are different decisions, and both need a visible record.
- Set the coverage brief. Define the panels to cover, the information to display, and the markings that must remain visible. Ask the installer to identify lights, sensors, cameras, trim, and other areas requiring clearance or exclusion.
- Review vehicle-specific proofs. Check the artwork against photographs and the confirmed body configuration. Inspect text across sliding doors, panel breaks, handles, and recesses; do not approve from a flat logo sheet alone.
- Check the message. Verify the business name, contact details, service wording, and any supplied operating identifiers. Where you include a QR code, test the destination and discuss practical placement; a successful screen scan does not prove roadside readability.
- Freeze the production version. Assign 1 named approver to the final decision. Record Approved artwork, Revision, Approved by, and Approval date, then identify exactly which vehicles that approval covers.
Expected result: The installer and vehicle owner can identify the same approved file, coverage plan, and applicable vehicles without interpreting a chain of messages.
Choose coverage before releasing artwork
These options solve different branding needs. None removes the need for sound paint, compatible materials, or maintenance in Florida sun and salt exposure.
| Coverage option | Best for | Advantage | Limitation |
|---|---|---|---|
| Full wrap | Owners seeking broad exterior graphics | Gives the design more connected panel area | Requires planning around more edges, recesses, and surface conditions |
| Partial wrap | Owners concentrating graphics on selected panels | Leaves unaffected areas outside the wrap scope | Artwork must work with the exposed paint color and coverage boundaries |
| Cut lettering and decals | Owners prioritizing identification and contact details | Keeps the message focused without covering broad panel areas | Offers less continuous graphic coverage and still needs compatible paint |
Approve the coverage that serves the message, not simply the largest printable area. Full coverage creates more design space, but it also creates more installation details to resolve.
Installation handoff
The installation handoff turns an approved concept into controlled work. This is where surface preparation, material instructions, and vehicle availability must agree.
- Authorize the exact scope. Confirm the approved revision, covered panels, exclusions, material selection, and any removal of existing graphics. Ask how repaired panels and existing protective treatments affect the proposed work.
- Confirm the preparation instructions. Follow the installer’s directions for vehicle delivery and cleaning. Do not apply wax, dressing, or another coating immediately before the appointment unless the installer specifically requests it.
- Document arrival condition. Review the vehicle with the installer and record existing damage, missing trim, accessories, and items requiring removal. Clarify responsibility for any agreed disassembly and reassembly before work begins.
- Control changes during installation. If an unexpected repair, adhesion concern, or fit issue changes the scope, pause that decision for approval. Keep the revised instruction with the vehicle record instead of treating a verbal conversation as the production file.
Expected result: The vehicle enters installation with an agreed scope and a visible change-control route. New findings do not silently become different coverage or an unapproved design compromise.
The 2026 planning rule is straightforward: Do not promise a universal turnaround before the vehicle and scope are assessed. Preparation, removal work, body condition, and material requirements differ between units.
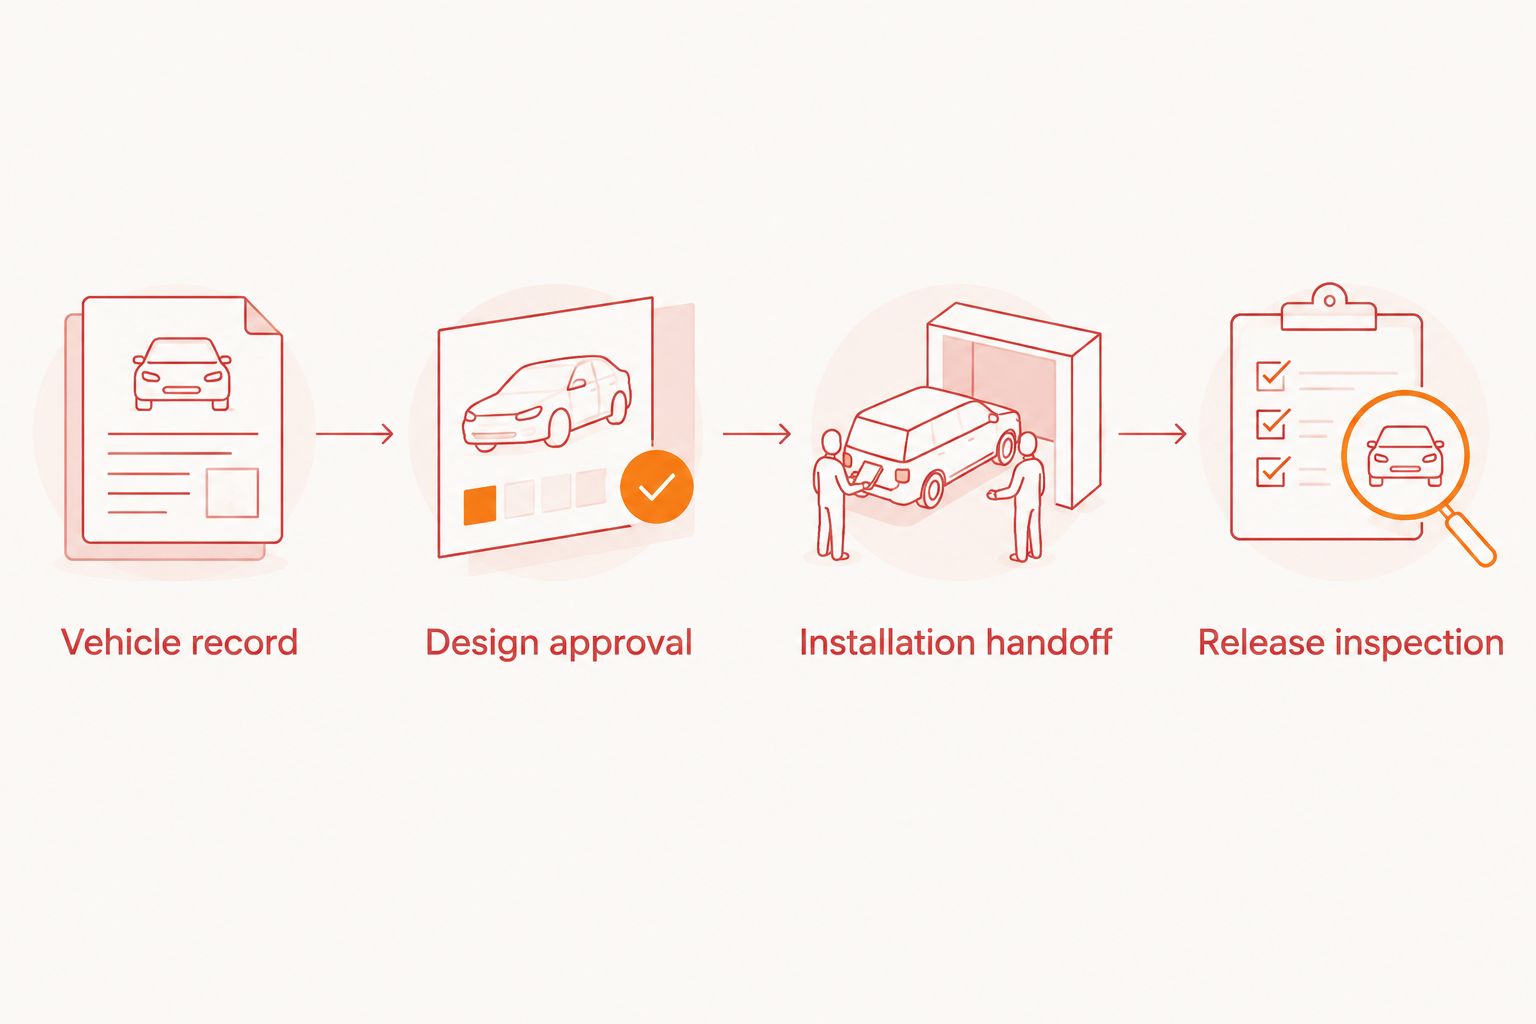
Release inspection
Road-ready means the vehicle has passed the agreed wrap inspection and is ready for its intended use under the installer’s instructions. It does not mean the wrap appointment replaces normal vehicle safety checks.
- Compare the result with the approved proof. Check wording, orientation, coverage, alignment, and vehicle identifiers. Inspect each side rather than accepting a single completion photograph as the whole handover.
- Inspect application details. Review seams, edges, recesses, trim, and any removed components with the installer. Raise lifting edges, unintended wrinkles, trapped debris, or damaged graphics before accepting the work; ask the installer to distinguish a defect from an expected material characteristic.
- Confirm functional clearances. Check that doors and access panels operate normally and that required lights, markings, cameras, and sensors remain unobstructed. Escalate any functional concern instead of assuming it is cosmetic.
- Collect care and release instructions. Obtain the applicable guidance for washing, environmental exposure, adhesive settling, and any return inspection. Record Released by, Release date, and Care instructions before returning the unit to its route.
Expected result: You have an accepted vehicle, completion photographs, documented open items, and care instructions matched to the installed material.
Keep a separate status for Installed and Released in your 2026 tracker. A completed application is not the same as an accepted handover, especially when a vehicle returns after hours or a different employee collects it.
Repeat the workflow when a vehicle or design changes
A fleet rarely stays unchanged. A replacement van, a new phone number, or collision repair needs a controlled update rather than an informal request to reproduce the last job.
- Replacement vehicle: Copy the approved message, not the old fit assumptions. Verify body configuration, surface condition, and panel placement again.
- Contact-detail change: Identify every affected vehicle and the exact artwork elements being replaced. Ask whether the proposed change requires a replacement panel or another agreed correction.
- Collision repair: Disclose the repair and ask the repairer and installer to confirm that the finish is ready for film under the applicable paint and adhesive instructions.
- Additional fleet unit: Match the approved design reference while checking the new vehicle independently. Record any accepted differences instead of calling them identical.
If you use task automation, make a change to Approved artwork create a review task—not automatic production authorization. A new file must not silently override a signed-off vehicle-specific proof.
This second workflow preserves the useful parts of your 2026 approval record while reopening the decisions affected by the change.
Troubleshooting
The proof fits the model but not the vehicle
Stop production authorization and compare the proof with current photographs. Confirm roof height, wheelbase, door arrangement, trim, and accessories; then request a corrected proof tied to that specific unit.
Film adhesion is questioned after delivery
Disclose all known surface treatments and repairs, including anything applied since the initial assessment. Let the installer determine the required preparation or whether a panel should be excluded; adding pressure or heat yourself is not a substitute for diagnosis.
A wrapped edge begins lifting
Photograph the affected area and contact the installer before pulling, trimming, or applying glue. Keep pressure-washer spray away from the lifted edge and follow the installer’s repair instructions.
Fleet colors look different between vehicles
Compare vehicles under the same lighting and check the approved artwork and material references. Record the discrepancy for the installer to assess; a phone photograph or monitor image alone is not a reliable color acceptance standard.
Dispatch needs a vehicle before handover is complete
Ask which checks or material-specific instructions remain outstanding. Arrange an alternative vehicle or revise dispatch rather than marking the unit released without acceptance.
Customize your workflow
Use one shared approval structure, but keep separate specifications for different services. Coaterz provides vinyl wraps and paint-protection services; those services do not have interchangeable purposes or preparation requirements.
A branding wrap changes the vehicle’s visible presentation. Paint protection film addresses a different protection brief, and a ceramic coating is not a replacement for impact protection. If you want combined treatments, ask for a compatible installation sequence rather than assuming every coating belongs above or below every film.
For Florida Gulf Coast use, include a care discussion about sun exposure, salt contamination, washing methods, and storage. Do not assume a wrap makes the vehicle maintenance-free or treats underlying corrosion. Request material-specific guidance instead of assigning a generic lifespan to every fleet unit.
Coaterz vinyl wrap installation is the relevant service when your objective is professionally applied vehicle graphics. Keep claims about durability, removal, and any warranty tied to the actual material and written scope—not a fleet-wide assumption.
FAQ
What is the fleet vehicle wrap installation process?
The fleet vehicle wrap installation process connects vehicle assessment, design approval, installation handoff, and release inspection. Each vehicle needs its own surface review and fit confirmation, even when the graphics repeat across the fleet.
Can I approve one design for every vehicle in my fleet?
You can approve a shared design concept, but each body configuration still needs a fit check. Door layouts, roof heights, accessories, and panel seams can change where graphics belong.
How long does a fleet wrap installation take?
The schedule depends on the assessed vehicle, preparation, coverage, and installed material’s instructions. Confirm the installation and release plan with the installer instead of assigning every vehicle the same turnaround.
Can a vehicle with ceramic coating receive a vinyl wrap?
An existing ceramic coating must be disclosed before wrapping because surface treatments can affect adhesion. The installer should assess the surface and specify any preparation before accepting the work.
Does a fleet wrap replace paint protection film?
A branding wrap is not a substitute for a paint protection film specification. If your goal includes impact protection, discuss that requirement separately and confirm material compatibility and installation sequence.
What should I check before collecting a wrapped vehicle?
Compare the installed graphics with the approved proof, inspect application details, and confirm functional clearances. Collect the applicable care instructions and document unresolved issues before accepting the vehicle.
Is Coaterz a fit for Florida Gulf Coast vehicle owners?
Coaterz provides professional vinyl wrap installation and other automotive protection services for vehicle owners in the Tampa Bay and Florida Gulf Coast area. Confirm your vehicle, desired coverage, and project requirements directly before scheduling.
One last thing
Treat removal as a planning question before installation. Ask how existing paint condition, repaired panels, future graphic changes, and the selected material affect eventual removal. A wrap approval that ignores the underlying finish leaves an important ownership decision unresolved.