

Yes, you can remove window tint yourself without damaging the glass, but a damage-free result is not guaranteed: use gentle, even warmth, peel slowly, and avoid metal blades or abrasive cleaning. Rear-window defroster lines, glass-mounted antennas, existing chips, and unknown surface treatments are reasons to choose professional assessment instead of DIY removal.
- Remove window tint yourself only after checking the glass, film condition, and any defroster or antenna lines.
- Gentle warmth and slow peeling help release window film; aggressive scraping risks damage.
- Rear-window defroster lines need special care because peeling film can lift the conductive material.
- CoaterZ suits Florida Gulf Coast owners seeking professional window tint installation rather than a DIY installation project.
Why this matters: Removing tint is not just a question of whether glass resists scratches. Adhesive, electrical traces, door seals, upholstery, and existing coatings all need protection. For your 2026 project, judge the whole window assembly—not just the visible pane.
For replacement tint, CoaterZ provides automotive window tint services for owners in the Tampa Bay and Florida Gulf Coast area. Decide whether removal belongs in professional hands before lifting the first corner.
Can you remove window tint yourself without damaging the glass?
Yes, but the safest approach depends on the surface underneath the film. An accessible side window without attached electrical traces presents a different job from a curved rear window with a defroster grid.
The comparison below separates the main choices. None guarantees damage-free removal, and professional handling cannot reverse glass damage or deteriorated electrical traces that already exist.
| Approach | Best for | Main advantage | Main limitation |
|---|---|---|---|
| DIY removal on an accessible side window | Owners who can identify the surface and control heat and moisture | You can work gradually and inspect the film as it releases | Adhesive cleanup and hidden edges still require care |
| Professional assessment before removal | Rear glass, electrical traces, damaged glass, or uncertain surface treatments | The removal method can be selected around the actual window condition | Existing damage still needs separate evaluation |
| Stop and leave the film in place temporarily | Film that shreds, glass that is cracked, or trim you cannot protect | Prevents a difficult removal from becoming forced scraping | The visibility or appearance problem remains unresolved |
DIY tint removal is a reasonable choice only when you can protect the entire window assembly. A pane that looks simple from outside can have sensitive components on its interior surface.
Check whether you are removing film at all
Aftermarket tint normally has an edge where the applied film ends. Factory privacy glass gets its color from the glass itself; it does not peel away like an adhesive film.
Inspect an accessible edge without cutting or scraping. If you cannot identify a separate film layer, stop rather than trying to remove color that is part of the glass. A window can also have aftermarket film over factory-colored glass, so removing film does not necessarily make it clear.
Accessible side windows: the more manageable DIY case
An accessible side window gives you room to observe the film and control your pulling direction. It is the better DIY candidate when the glass is intact, the film edge is reachable, and no sensitive surface treatment or attached conductor is present.
The limitation is access around the perimeter. Film and adhesive can extend close to seals, and careless cleanup can push liquid into a door or leave residue where the glass travels.
Before starting, gather soft cloths, protection for the interior, a suitable source of gentle warmth, and a cleaner explicitly compatible with the surfaces it will contact. Follow equipment and cleaner instructions; do not substitute stronger heat or a stronger solvent when progress slows.
Follow this removal sequence
- Surface check. Examine the glass for chips, cracks, existing scratches, electrical traces, and unfamiliar coatings. Read the vehicle instructions for relevant glass-care restrictions. Stop if the substrate is uncertain.
- Protect interior. Cover nearby upholstery and trim with absorbent protection. Keep liquid out of switches, speakers, seals, and door openings, and provide ventilation when using a cleaner.
- Soften edge. Apply gentle, even warmth according to the equipment instructions. Keep the source moving; do not concentrate high heat on a cold pane or one small area.
- Slow peel. Lift an accessible film corner without a metal blade. Pull gradually, keeping the released film close to the pane rather than jerking it outward. Stop if the film shreds or resistance increases.
- Residue check. Inspect the exposed area before continuing. Use a compatible adhesive cleaner as directed, then remove loosened residue with a soft cloth instead of grinding it across the glass.
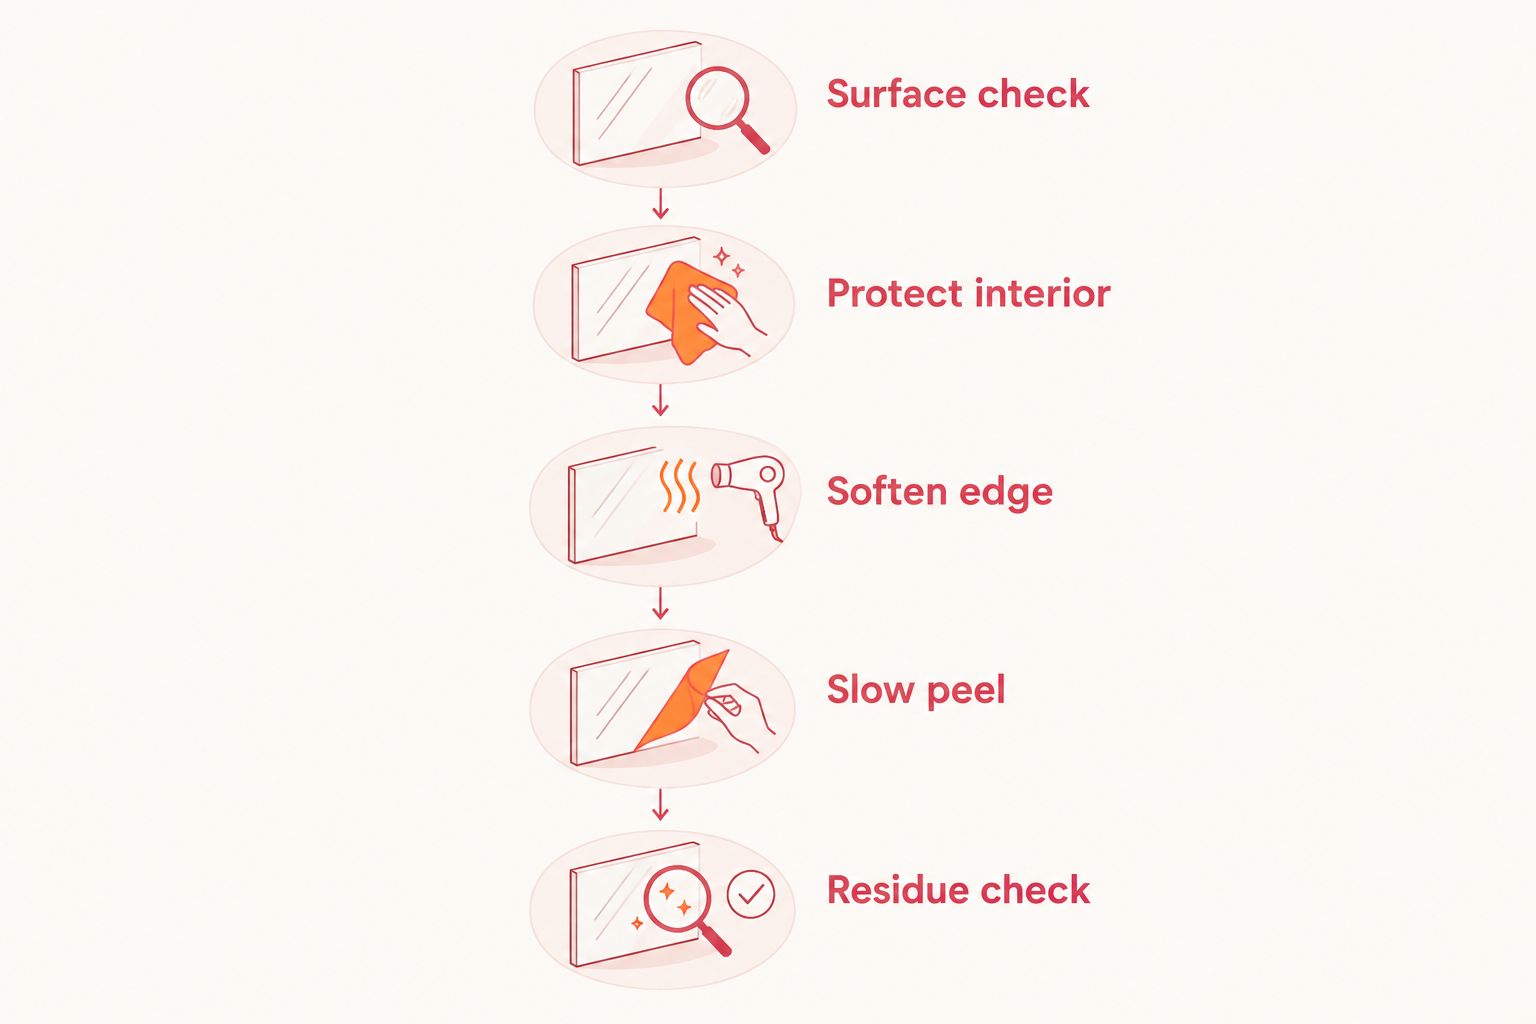
Treat this as an inspection-led process, not a race. If a small section releases cleanly, continue cautiously; if it does not, change the plan rather than increasing force.
For a 2026 DIY checklist, the most useful addition is a clear stopping rule: stop when the next action would require harder pulling, concentrated heat, or aggressive scraping.
Rear windows: protect defroster and antenna lines
Rear-window defrosters commonly use conductive traces on the inside of the glass. Some vehicles also have glass-mounted antenna elements. Film removal and adhesive cleanup can damage these components even when the glass itself remains unmarked.
That distinction matters. A clear-looking rear window is not proof that the defroster still works, and a scratch-free pane does not establish that an antenna connection remains intact.
Choose professional assessment when film covers exposed defroster or antenna traces. Avoid metal blades, abrasive pads, and forceful rubbing over those elements. Do not pull harder simply because a broad sheet of film appears ready to release.
Before arranging removal, note whether the rear defroster already works and photograph visible defects. Existing broken lines and lifting traces need to be distinguished from the removal job itself.
Professional handling offers a more informed choice of technique, but it is not a promise that aged or compromised traces will survive. Ask how the installer assesses the glass and what happens if the film resists removal.
Why window tint removal difficulty varies
The same technique does not suit every vehicle. These factors determine whether the job stays manageable or calls for a different approach:
- Film condition. Brittle or separating film breaks into fragments, making controlled peeling harder.
- Adhesive behavior. Film that lifts cleanly and film that leaves sticky residue create different cleanup tasks.
- Surface compatibility. A cleaner suitable for plain glass is not automatically suitable for a coating, electrical trace, plastic trim, or upholstery.
- Window access. Curved glass, tight corners, and nearby trim restrict your ability to apply warmth and control the peel.
- Existing damage. Chips, cracks, scratches, and damaged traces change the risk before removal starts.
- Heat and moisture control. Uneven heating and uncontrolled liquid introduce risks beyond the adhesive itself.
For Palm Harbor, Lutz, and Sarasota owners planning removal in 2026, strong Florida sun is not a substitute for controlled heating. Start with a stable work area and a pane that is not excessively hot to touch.
Salt residue and road grit also belong in the preparation stage. Remove loose contamination from surrounding work areas so it does not transfer to cloths and become an abrasive during cleanup.
What should you avoid when removing window tint?
Avoid metal blades, abrasive pads, and uncontrolled heat as default DIY tools. Glass type, surface treatments, and attached components vary; a method shown on another vehicle does not establish compatibility with yours.
A heat gun can deliver concentrated heat quickly. Do not use it as a shortcut when gentle warming fails. Steam also requires care: hot vapor can burn skin, and moisture needs to stay away from electrical components and sensitive trim.
Do not mix cleaning chemicals. Read the adhesive remover’s label, confirm compatibility, and keep the product off surfaces the instructions exclude. A concealed spot test does not override a manufacturer’s warning.
Avoid trying to cut the film directly against the pane. Cutting can score the glass, damage a nearby seal, or contact a conductor you did not see.
How do you remove leftover tint adhesive safely?
Use a surface-compatible adhesive cleaner and a soft cloth, following the cleaner’s instructions. Allow the product to work as directed rather than compensating with pressure or abrasive scrubbing.
Work in small areas so you can see what is changing. Keep turning to a clean section of cloth; softened adhesive smeared across the window can look like a remaining film layer.
On rear glass, compatibility with plain automotive glass is not enough. Confirm suitability around the defroster and antenna elements, and stop if a trace begins to lift or discolor.
After cleanup, inspect the window from different angles in good light. Check the edges, where residue is easy to miss, and make sure nearby seals and trim are clean and dry.
When should you choose professional help instead?
Choose professional assessment when the film covers electrical traces, the glass is damaged, the film repeatedly tears, or you cannot protect the surrounding interior. The strongest reason to stop is not inconvenience; it is uncertainty about what your next action will damage.
For owners considering replacement tint in 2026, discuss removal and installation as separate parts of the job. Ask whether existing film assessment and adhesive cleanup are included in the proposed work rather than assuming they are.
CoaterZ window tint services are relevant to Gulf Coast owners planning a new installation. Confirm removal requirements directly before booking; a window tint service description does not establish the condition or removal needs of your existing film.
When selecting replacement film, separate darkness from performance. The guide to window tint shades and heat rejection addresses that comparison; do not assume the darkest appearance automatically gives you the heat-control result you want.
Ask about the specific film’s documented solar performance, glass compatibility, care requirements, and applicable tint rules. Treat warranties and durability as product-specific terms, not benefits shared by every tint option.
Discuss your next tint installation
Ask about existing film, glass condition, and replacement tint for your Gulf Coast vehicle.
FAQ
Can I remove window tint myself without scratching the glass?
Yes, but damage-free removal is not guaranteed. Inspect the surface first, use gentle warmth and slow peeling, and avoid metal blades or abrasive cleanup.
Can removing tint damage my rear defroster?
Yes, peeling film and cleaning adhesive can damage exposed rear-window defroster traces. Choose professional assessment when film covers these elements, especially if any lines already appear damaged.
Can I peel off factory privacy glass tint?
No, color built into factory privacy glass does not peel off. A separate aftermarket film applied over that glass can be removable, but the original glass color remains.
Is a steamer safer than a razor blade for tint removal?
A steamer avoids direct blade scraping, but it does not make removal risk-free. Hot vapor can burn skin, moisture can reach sensitive components, and film can still pull on electrical traces.
What should I do if the tint comes off in tiny pieces?
Stop pulling when the tint repeatedly breaks into small pieces. Reassess the method or seek professional help rather than increasing heat, force, or scraping pressure.
Should I put new tint over leftover adhesive?
No, do not use new tint to cover leftover adhesive. The glass needs appropriate cleaning and inspection before installation; residue interferes with a clean installation surface.
Does CoaterZ offer window tint services near Tampa Bay?
CoaterZ provides automotive window tint services for vehicle owners in the Tampa Bay and Florida Gulf Coast area. Confirm the assessment and removal requirements for existing film directly before arranging replacement tint.
One last thing
The component most at risk is not always the glass. A defroster trace, antenna element, seal, or interior trim panel can be damaged while the pane still looks perfect.
Before your 2026 removal project, write down what would make you stop. If that list includes torn film, lifting traces, excessive heat, or uncertain cleaner compatibility, follow it when the job becomes frustrating—not after damage appears.